virimine

ONE MATERIAL TO HEAL THEM ALL: SEGMENTED HEALTH BAR PART I

A SNEAK PEAK INTO TILING, GRIDS, GRADIENT MASKS AND ANIMATION

Hello adventurers!

Ever wanted to make a segmented health bar, but rolling through a for-loop to spawn individual pips felt… well, outdated? Same here! That’s why I decided to create a UI material-based solution in Unreal Engine 5. 

This version supports:

  • Healing and taking damage
  • A damage feedback animation
  • A Shield
  • Dynamic pip count (perfect for those juicy health upgrades!)

Couple of things before we start…

  • The bar was created as part of my work at Silkroad Studios.
  • Custom nodes that start with “MF_UI” can be found in the UI Material Lab.
  • Complex logic in materials can be harder to debug than Blueprint widget trees. To tackle this, make sure to comment your material graphs well.

Advantages Over Traditional For-Loop Pip Generation:

🔥 Performance: No tick-based logic, no hundreds of widgets sitting in your hierarchy. Everything is driven by a few exposed parameters and just one draw call.
🎨 Easy Styling: Want to add gradients, glows, or funky distortion? It’s all right there in the material graph. 
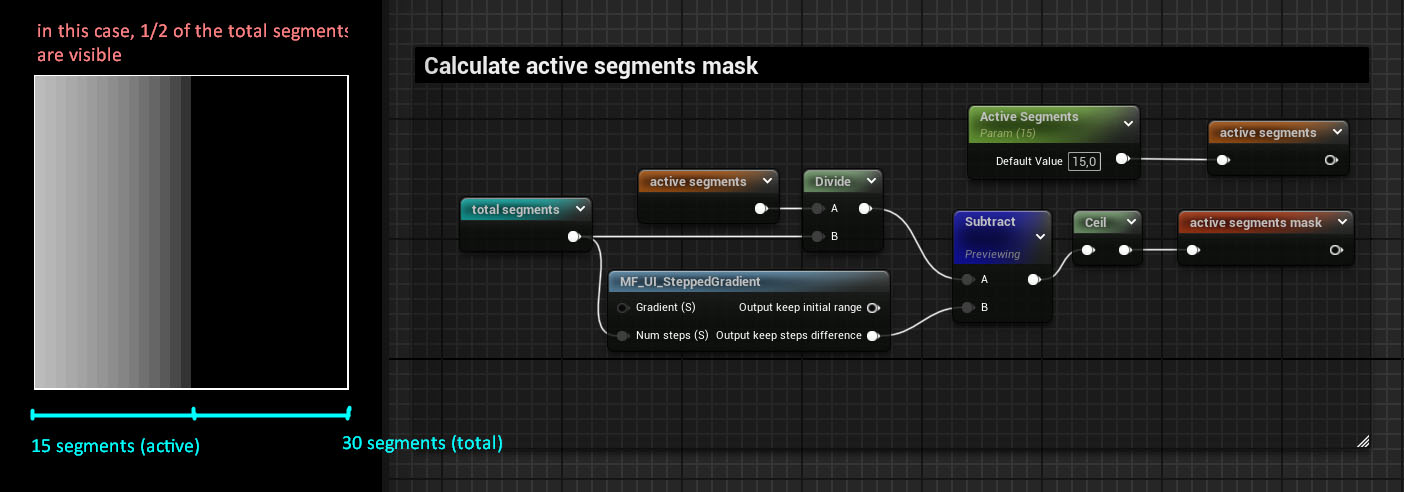
📏 Perfectly Scalable: Whether it’s 5 circular pips or 50 rectangular ones, the math stays the same. Just change the pip count and shape, and you’re good to go.
⚡️ Real-Time Responsiveness: You get instant visual feedback just by updating one float or vector. Perfect for damage animations or shield effects.
🧩 Flexible Logic: You can visualize health, shields, armor, even energy or ammo bars, all with a single material instance.

This method might not be ideal when:

  • You need per-pip interactivity (e.g. hover/click tooltips on each pip).
  • Your design requires non-uniform spacing or wildly different pip shapes.
  • You’re showing very few pips (e.g. 3–5), and your UI logic is already simple. In that case, a widget loop might be quicker to implement.
  • The team is not as comfortable working with shaders or in-engine.

Let’s dive into the process.

1. Control Parameters

The following material parameters have been exposed to give us control over behavior in both runtime and sequencer-driven animations.

2. Pips Tiling

We start by tiling the base UVs using the MF_UI_GridTiling material function. This lets us dynamically define how many segments (or “pips”) we want, set by the Total Segments parameter (e.g. 30). The function gives us pattern UVs that repeat across the surface based on the segment count. Next, we use MF_UI_SDF_Box to draw each pip, which is driven by the pattern UVs from the tiling.

3. Unlocked Segments Mask

At this step, we do a bit of Maf to isolate which pips should be visible – the unlocked (or active) ones.

First, We divide active segments by total segments to get a 0–1 value representing how much of the bar is filled. Then, MF_UI_SteppedGradient gives us a stepped 0–1 gradient based on how many segments we want (e.g.10, 20, 30…). This lets us reveal discrete pips instead of a smooth bar.

We subtract the stepped gradient from the normalized active value. This gives us a mask where all values below 0 are inactive, and values above 0 are active. Finally, we pass that result through a Ceil node to cleanly round everything up to either 0 or 1. This gives us a crisp binary mask:

  • 1 for active pips,
  • 0 for inactive ones

4. Remaining Health Fill

To show how much remaining health the player has, we need a fill effect that exists across the active pips (not the entire bar). This also lays the groundwork for things like damage or healing feedback. The MF_UI_GridTiling helps break the bar’s UVs into equally spaced segments. The division is driven by the ratio of active segments / total segments.

Example: if you have 15 total and only 5 are active, we only generate a gradient over 1/3 of the bar.

A Mask (R) node keeps only the U coordinate (horizontal axis), which is where the gradient will appear. The gradient is then multiplied by the active segments mask, so that only the currently active pips are considered.

The result is compared to a current fill amount (a 0–1 float representing health percent), passed through a Saturate node to clamp it safely between 0 and 1. The Step node then outputs a binary mask: 

  • 1 for filled pips
  • 0 for unfilled ones

5. Damage Feedback Effect

To create a feedback effect when the player takes damage, we need to know what portion of the health bar was just lost. The current fill amount is the player’s health now. The prev fill amount is the player’s health from before taking damage.

Both values are compared against the active segments gradient using a Step node. This creates two binary masks: 

  • 1 where the fill is still present
  • 0 where it’s empty

Example: If prev fill = 0.6 and current fill = 0.4, then segments between 40%–60% should flash.

We multiply the result by the active segments gradient to create a gradient within our generated mask. To visualize damage with a satisfying animated feedback, we need a normalized gradient that plays across the area where health was just lost. This is why we feed the masked gradient into an InverseLerp node. This remaps the values so that what was originally dark → light (random values between 0 – 1) becomes white → black (1 → 0). It reverses the gradient direction while clamping the range between 0 and 1.

The remapped gradient is then controlled using a variable called is updated. This value is animated via the Sequencer. As is updated changes, the mask moves across the damaged area, giving players that juicy feedback when they lose health.

Finally, we multiply the animated gradient by the existing active segments mask or main fill to make sure the effect stays within the visible, filled pips and doesn’t spill over into empty or shield areas.

Wrapping Up –  Part I

Alright, this article is getting chunkier than a boss health bar so that’s it for Part I! We’ve covered how to build a segmented health bar using materials in UE5, including pip logic, active/inactive segmentation, dynamic fill ratio, and damage feedback, all without looping through widgets or manually placing pips.

In Part II, we’ll talk about:

  • Adding a shield 
  • Layer blending to add colors
  • How to hook everything up in Blueprints
  • Anti-aliasing methods

Stay tuned~ and let me know if you try this out or have questions. I’m always curious to see how others use it!

Scroll to Top